|
DISMOUNTING OF ENGINE 1) Clean engine before dismounting.
2) Screw off exhaust socket.
Tool:hex. socket screw key 6 mm
Dismount cylinder cowl and fan cowl with rewind starter.
Tool: socket wrench 10/13 mm
Screw off carburetor socket
Tool: hex. socket screw key 6 mm
Fix crankshaft to top dead center through the impulse connection.
Tool: crankshaft fixation bolt 876 640
Unscrew starting pulley,
Tool: socket wrench 10 mm
Fix puller ring on the magneto housing with 3 hex. screws
M8 x 25.
Tools: puller ring 876 655
hex socket screw key 5 mm
Unscrew crankshaft nut, mag. side
Tool: Socket wrench 27 mm with extension (or torque wrench)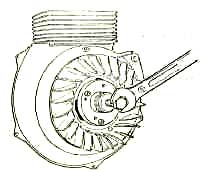
Place protection mushroom on crankshaft and screw puller into puller
ring, then pull off the magneto housing (see ill. no.
Tools: Protection cap 876 557, puller ring 876 655 puller for magneto
housing 876 065 fork wrench or socket wrench 22
277 Rotax - Rotax 277
Engine Manual
Dismount ignition coil
Tools:
Socket wrench, screwdriver
Mark armature plate position to crankcase for re-assembly. Screw off
armature plate, remove cable grommet and pull through wiring harness.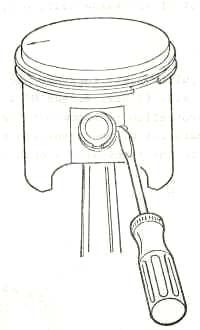
Tools:
Hexagon socket screw key 4 mm screwdriver
Unscrew cylinder head nuts
Tool: Socket wrench 13 mm
13) Take off cylinder head, cylinder head gasket, cylinder and cylinder
base gasket.
14) Cover opening in crankcase with a clean cloth.
15) Remove piston pin circlips (see ill. no. 2)
Tool:
Small screwdriver, shaped as shown on ill. no. 2.
277 Rotax - Rotax 277
Engine Manual
Push piston pin out by hand.
Tool:
Suitable punch for piston pin.
Attention:
When pushing out the piston pin, the piston must be firmly held by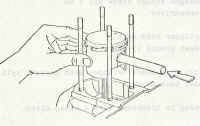 hand
to prevent bending of the connecting rod (see ill. no. 3).
Dismount, crankcase and remove crankshaft. Remove the 5 hex. screws with
socket wrench i3 mm.
Push crankshaft out of crankcase half, p.t.o. side, with a puller.
Procedure:
Screw puller and puller plate together and fix them on crankcase,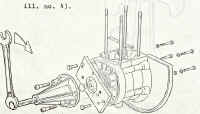 p.t.o.
side (2 hex. screws M8 x 25). p.t.o.
side (2 hex. screws M8 x 25).
Attention:
Use
protection mushroom 876 552.
Then push crankshaft out of the crankcase by turning the puller screw
to the right with wrench 22 mm (see ill. no. 4).
277 Rotax - Rotax 277 Engine Manual
Take crankcase gaskets carefully off.
After removing the crankshaft from the crankcase, p.t.o. side, remove
puller with plate. The puller itself need not be screwed off the plate.
The puller with plate is then placed on crank- case, mag. side, and is
fixed by 2 screws M8 x 100. Use protection mushroom 876 557.
ATTENTION:
To avoid damage to the crankcase sealing surface, shims
have to be used by all means and the nuts have to be tightened by hand
(see ill. no. 5).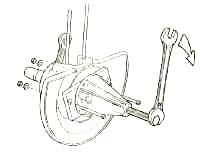
Tools:
puller plate 876 705
puller assy. 876 296
2 cyl. screws M8 x 100
2 washers 8.4 mm
2 hex. nuts M8
protection mushroom 876 552 protection mushroom 876 557
277 Rotax - Rotax 277
Engine Manual
Removing of ball bearing from crankshaft
see ill. #6.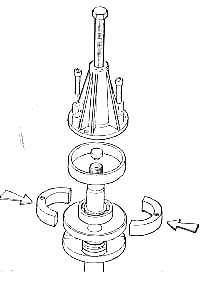
Put ring halves for bearing 6306 over ball bearing.
Put outer ring over ring halves 276 020.
Use protection mushroom 876 552 or 876 557.
Fix puller by 2 cyl. screws M8 x 40 to the ring halves. Pull off ball
bearing by burning the puller screw to the right.
Repeat procedure for ball bearing
6206 with ring halves 977 470.
|


